Uncontrolled stockpiles of horse manure can be an unsightly, smelly and fly-infested mess. Stockpiles also can cause runoff pollution in nearby streams and ponds.
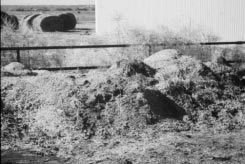
This stockpile of horse manure, straw and wood shavings is unsightly and, if uncontrolled, can pose a threat to water quality in nearby streams and ponds.
For horse enthusiasts, veterinarians and operators of boarding stables, handling and disposing of horse manure can pose numerous challenges. Frequently, operators of equine facilities and large-animal veterinary clinics must pay someone to take the manure off the property.
However, there is an excellent way to stimulate demand for a product that would otherwise be a liability. Composting manure can eliminate a messy problem and provide a modest additional income.
For the horse enthusiast interested in composting, it is important to understand the basic scientific principles and other factors that contribute to successful compost management.
What is composting?
Composting is the controlled breakdown or degradation of organic material into a product known as humus. The composting process must be:
- Aerobic. In the presence of air, or specifically oxygen, organic material degrades without creating problems associated with odor. Biological degradation that takes place without oxygen, or anaerobic digestion, is often called “fermentation.” It usually is associated with intense and disagreeable odors.
- Biologically mediated. A biologically mediated process like composting takes advantage of naturally occurring microbes to digest the organic material. The addition of heat normally is not required. By contrast, a purely chemical oxidation of organic material is generally known as “combustion.”
- Thermophilic. High-quality compost for agricultural or horticultural use is produced at temperatures between 130 degrees F and 160 degrees F (thermophilic composting). At these elevated temperatures, microbial pathogens such as coliforms and salmonella are destroyed, and all but the hardiest weed seeds are killed. Composting processes that take place at ambient temperatures between 50 degrees F and 90 degrees F are known as mesophilic composting.
- Controlled. Wherever manure is stockpiled, some degree of aerobic and/or anaerobic digestion occurs. However, the end result is variable and unpredictable. Composting is a controlled process. Organic material is managed in a systematic way and within a designated time frame to yield a consistent, predictable end product.
In complete composting, organic matter, such as carbohydrates, sugars, proteins, fats and cellulosic compounds, reacts with oxygen and water to produce carbon dioxide and humus. Incomplete composting produces intermediate products, such as fatty acids, that have an offensive odor and that can be toxic to plants. As a result, composting systems should be properly designed and managed to ensure the complete breakdown of organic matter.
Compost maturity
When manure and other organic matter are completely oxidized or degraded, they are termed “mature” compost. Compost maturity is crucial to quality assurance and quality control when marketing a compost product for agricultural or horticultural use.
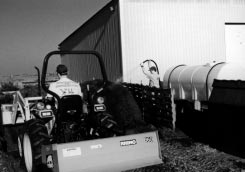
Supplemental water can be sprayed into compost bins from a trailer-mounted
tank as the material in each bin is turned and moved.
There are several well-established ways to determine compost maturity. The easiest but least reliable way is to monitor the internal temperature of the compost bulk using a long-stemmed thermometer. Temperatures in fresh compost stocks rise quickly – up to 160 degrees F and greater – and then decline slowly until the compost temperature again approaches the air temperature. If the composting material reheats spontaneously after turning, aerating or rewetting, it is probably not mature. Instead, the aerobic microbes probably ran out of oxygen, nitrogen or water before all of the organic material degraded.
A better method of determining compost maturity is based on the rate of microbial respiration or gas exchange. Respirometry-based maturity tests create standardized moisture and aeration conditions within a compost matrix, and then measure oxygen consumption or carbon dioxide production during a specified period of time. If oxygen consumption during that period is below a certain threshold, the compost is considered mature.
One well-known commercial test for compost maturity is the Solvita test kit from Woods End Laboratories. The Solvita test is a simple, 4-hour maturity assay in which the color of a test strip changes in response to changes in oxygen and carbon dioxide saturation in a closed container. A maturity index between 1 (immature) and 8 (mature) is then determined by comparison with a set of standard colors.
The Texas Department of Transportation requires maturity assays using the Solvita test or its equivalent on all compost used in vegetation along public roadways. A minimum value of 7 is required to meet the TXDOT specification.
Compost maturity has important implications for plant growth. Mature compost does not compete with plants for nutrients that may already be limiting. If unfinished compost is mixed into the soil, the aerobic microbes may compete with plants for essential nutrients, stunting growth or killing the plants. In addition, immature compost is likely to be relatively high in fatty acids that are toxic to plants.
Optimal conditions for composting
A manager of a small-scale composting system must respond to a broad range of conditions such as variable manure composition and uncontrollable weather. Certain conditions, however, can be controlled to improve various elements of the composting process. These include moisture, carbon-to-nitrogen ratio and oxygen saturation.
Moisture – Sufficient water provides soluble nutrients for the microbes necessary for composting. If the moisture content is too high, however, it reduces the supply of oxygen and offensive odors often develop. In most cases, a moisture content between 45 percent and 55 percent by weight results in efficient, thermophilic composting. Because the elevated temperatures accelerate evaporation, water must often be added to ensure that the composting process does not shut down prematurely. This is nearly always true in semiarid climates like the Texas Panhandle, the Trans-Pecos region or the Southern Plains.
Carbon-to-Nitrogen (C:N) Ratio – Along with oxygen, the most important macronutrients for microbes are carbon and nitrogen. Just as human metabolism benefits from a proper balance of protein and carbohydrate in the diet, microbes in the composting process function best when available carbon and available nitrogen are properly balanced with moisture and oxygen.
Generally, the average C:N ratio that optimizes the composting system is 25:1 to 30:1 by weight. Higher C:N ratios cause nitrogen-limited conditions and nitrogen-poor finished compost. Compost that has a low C:N ratio will not stabilize Supplemental water can be sprayed into compost bins from a trailermounted tank as the material in each bin is turned and moved. nitrogen completely and can result in excessive release of gaseous ammonia to the atmosphere. Most livestock and poultry manure has a C:N ratio on the order of 15:1 or 10:1. Therefore, other material with high carbon content, such as crop residues, wood chips or sawdust, should be added to manure. A mixture of horse manure and wood shavings is well suited to complete composting.
Oxygen Saturation – Because aerobic microbes require oxygen dissolved in water to complete their work, composting efficiency depends on maintaining free oxygen in the pore spaces around the compost particles. Oxygen saturation measures the availability of free oxygen and is defined as the volume fraction of oxygen in the pore gas. Standard air has approximately 21 percent oxygen by volume, so normal oxygen saturation is 0.21.
As gaseous oxygen dissolves into water in response to the microbes’ oxygen demand, the oxygen saturation of the pore gas drops. If the oxygen saturation drops too low, the oxygen-dependent microbes will begin to shut down, and anaerobic microbes will assume responsibility for further digestion. This is accompanied by a noticeable temperature drop. Oxygen saturation for aerobic conditions can be maintained by passive or active (forced-air) aeration, depending on the permeability of the combined feedstocks. Horse manure combined with ample wood shavings or straw is porous and very permeable to gas because of varied particle size. Mixtures of manure and sawdust require a slightly higher degree of management to maintain adequate permeability in the compost bulk. If managed properly, however, sawdust will compost faster than coarser bedding materials.
Making compost from horse manure
There are several ways to design an on-farm composting system, and no single one is appropriate for all sizes and types of equine facilities. However, any system should consist of the following simple components:
- a staging area for raw manure;
- a set of four to six bins or free-standing piles large enough to maintain elevated internal temperatures;
- a mechanism for turning the piles or moving the compost from bin to bin, such as hand labor for small operations or a small front-end loader for larger areas; and
- a water faucet or a pump/water tank combination, and a spray nozzle.
The number and size of composting bins are determined by the amount of manure generated by the facility and the desired turning frequency. Establish a desired turning frequency of 2 weeks, 3 weeks, etc. Count the number of wheelbarrow loads of manure generated over that period of time. Estimate the capacity of each wheelbarrow load and multiply that by the number of loads to obtain the necessary bin volume. Then, to ensure adequate capacity for an increase in stocking rates, add another 50 percent of the volume.
For example, if the wheelbarrow holds 3 cubic feet of manure when heaping full, 16 wheelbarrows of manure are generated per day, and compost is turned every 2 weeks, the first bin should have a volume capacity as follows.
Capacity = (3 cubic feet/load x 16 loads/day x 14 days) x 1.50 = 1,008 cubic feet
The floor area of the first bin is computed by dividing the volume capacity by the design depth in feet. Compost piles should be at least 4 feet deep, so the floor area of the first bin is calculated as 1,008 ÷ 4 = 252 square feet, or measures approximately 16 feet x 16 feet. If the front-end loader has sufficient reach, the floor area can be reduced by increasing the operating depth to 6 or 7 feet. For a depth of 6 feet, the floor area would be 168 square feet, or 12 feet x 14 feet. The volume of material in each bin will decrease over time as materials degrade, so subsequent bins may be slightly smaller if necessary. By the time the compost is mature, its volume may have decreased by as much as one half.

A simple, well-managed composting system is visually appealing and is unlikely to cause water quality problems.
The moisture content of the manure and bedding is normally 50 to 60 percent in the raw state, so additional moisture probably will be unnecessary until the compost is moved to the second or third bin. Have an ample water supply and pressure to moisten the compost as it is turned. Moisture content can drop as low as 25 percent within 4 weeks. To increase the moisture content of compost from 25 percent to 55 percent, add about 20 to 30 gallons of water per 100 cubic feet of compost. For a system in which four bins (1,000 cubic feet each) require additional moisture, approximately 1,200 gallons of water are needed every time the bins are turned. However, the actual amount of water needed will vary substantially depending on the kind of bedding used, the size of the particles in the bedding and other sitespecific factors.
Don’t try to add all the water at once. Instead, use a spray nozzle to deliver the water to the compost as each loader bucket is turned into the bin. It is easy to verify the proper moisture content. Grab a handful of compost from the middle of a bin that has been mixed well, and squeeze the compost tightly in your fist. You should not be able to squeeze any free water droplets out of the compost, but it should leave your hand slightly wet. If you inadvertently get the compost too wet, don’t panic; just keep an eye on the compost temperatures in that bin and turn the compost if temperatures do not rise in a couple of days. If rancid odors emanate from any of the bins, the moisture content is probably too high. Turning the compost will help drive off some moisture and oxygen and alleviate the problem.
Measuring compost temperatures
Checking compost temperature is the easiest and quickest way to keep track of a composting system. A simple longstemmed thermometer (or two) and some good record-keeping skills are all that are needed.
Carefully insert the thermometer halfway down into the compost bulk and allow the needle or digital display to stabilize. This may take up to 2 minutes for dial thermometers. Record the date, time, bin or pile number, location within the bin (e.g., center, northwest corner, etc.) and temperature. Temperatures should be highest near the center, but take temperatures at several locations to average out any odd readings. Sometimes a thermometer will be inserted directly into a cold or wet spot that is not visible from the outside and that is not characteristic of the bin as a whole.
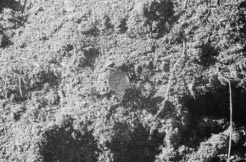
The 139-degree F reading on this long-stemmed thermometer confirms that thermophilic composting is underway.
Measure temperatures at least daily for the first week after the compost has been turned. Then, if temperatures in active bins are in the thermophilic range between 130 degrees and 160 degrees F, the time between measurements may be increased. Temperatures immediately after turning and wetting obviously will be near air temperature, but they should rebound markedly within 48 hours.
Keep the temperature measurements in a handy file to help document to prospective buyers that weed seeds and pathogens should not be a problem in your compost.
Monitoring compost maturity
Because compost maturity is extremely important for horticultural and agricultural users, it makes sense to begin a systematic process of maturity testing. Respirometry-based test kits cost between $15 and $20 each, so use them wisely! Do not use maturity tests for piles or bins that respond quickly to additions of moisture or to aeration (easily determined from temperature data). However, tests should be used in material that is within 4 weeks of sale to give you time to make adjustments. Again, temperatures will help in diagnosing problems, but they will not indicate maturity.
Laboratory analysis of compost
Agricultural users and commercial nurseries are keenly interested in compost levels of nitrogen, phosphorus and potassium and, in some cases, micronutrients such as iron or zinc. For use in potting mixes, salinity also is important because excessive salinity can interfere with seed germination. Typically, the nutrient content of compost in horticultural use usually does not limit growth in any manner. It is beneficial to have a laboratory analysis of compost from time to time.
Do’s and Don’ts for the small-scale composter
- DO make provisions for adding supplemental water when needed. Capturing rainwater from roofed buildings or putting a float valve on a bleeder line from outdoor plumbing may be all that is needed to keep a nearby tank full. In dry areas, shaping the tops of the piles to capture rainfall may be helpful.
- DO move enough dirt to ensure the compost area drains well. Ponded water, especially around manure and compost, will cause odor and fly problems. A small box blade will help keep the area smooth and well drained.
- DO monitor compost temperatures every few days. Temperature alone will not tell the full story, but it can be an indicator of success or of imminent problems.
- DO instruct employees to keep garbage, plastics, carcasses and animal-health products (syringes, vials etc.) out of the compost piles.
- DO keep the composting area clean and well maintained. A good image is vital to marketing success.
- DO use the finished product in your own landscapes, planters and gardens. If you use it and like it, your clients will be more inclined to try it, too.
- DO have laboratory analysis performed on compost samples from time to time. Knowing your product will reassure your clients and will help you identify ways to improve your system. A routine analysis will include nitrogen, phosphorus, potassium, sulfur and total salinity. Organic matter analysis adds significantly to the cost, but it will help you determine if manure-harvesting methods are picking up too much mineral soil, which reduces compost quality. If interested in using compost as a bedding material, periodic analysis for pathogens is good insurance.
- DO collect manure from the corrals and pens carefully. Try to keep mineral soil out of the manure, and keep track of how many wheelbarrow loads are delivered to your system every day.
- DO try to ensure good drainage from any outdoor horse pens from which manure is collected. Muddy conditions give you soil-laden manure, reducing the organic matter content per unit of compost.
- DON’T try to start a composting operation during extremely cold weather unless enough warm manure (above 50 degrees F) is available to immediately make a pile at least 4 feet deep. Small piles lose heat too rapidly to sustain temperatures suitable for the microbes. Turning piles during extremely cold weather may result in a slower rebound or a total shutdown.
- DON’T use the compost piles to degrade or store carcasses if you plan on marketing the material to the public. Composting carcasses is more difficult than composting manure, carries a significant marketing risk and is better suited to those operations that will be using the compost on their own property. If you want to use the composting system for carcass disposal, first make sure your system works well without carcasses; then add them and refine your technique as needed. In a good system, composting works well for animals of all sizes, from chickens to full-grown dairy cows. Professional advice will be helpful.
- DON’T give the compost away. A nominal fee stimulates interest, and the revenue will help you refine your techniques and equipment when opportunities arise.
- DON’T neglect damaged bin structures. Small damage quickly turns into heavy and expensive damage that can interrupt your compost system and make a quick recovery difficult.
- DON’T let employees use the compost piles as an alternative to the trash can. Baling wire, syringes, soda cans, twine and other inert materials can be fatal to a marketing effort. Quality, consistency and appearance are the cornerstones of marketing success.
- DON’T assume that bins are the only workable configuration for a composting system. Bins lend an air of organization to the system, but the major difference between a bin and a pile is just the bin itself. If you can devise a static pile system that is manageable, and if appearance is not the most important consideration, don’t bother with the extra effort or expense.
A composting demonstration
A large-animal veterinary hospital in Randall County cooperated with the Texas Agricultural Extension Service Tierra Blanca Creek water quality project to build a composting demonstration site for horse manure and wood-shavings bedding.
Prior to the composting project, the operators disposed of the manure by stockpiling it on the property. Every few months, the stockpile became so large and unsightly that the operators paid a hauler more than $1,000 to remove the manure. Runoff from the stockpile site was uncontrolled, and in wet weather, it was a potential nonpoint source of water pollution in a nearby stream.
A simple solution to the veterinarians’ manure-handling problem was to establish a series of six makeshift compost bins using 4 feet x 4 feet wooden pallets for the bin walls and steel T-posts for structural strength. The bins were erected along an existing steel pipe fence to give the wheel loader a sturdy push wall. Each of the bins was approximately 12 feet wide and 12 feet deep with 4-foot high walls, for a total volume capacity of approximately 20 to 25 cubic yards. Given the variability in the stocking rate at the clinic, each bin was estimated to have sufficient capacity to hold 15 to 30 days of manure accumulation.
As the project began, fresh manure and bedding were deposited by wheelbarrow into Bin #1. When B1 was full after approximately 2 weeks, its contents were transferred by small front-end loader into B2, re-aerating the compost. Fresh material was again delivered into B1. When B1 filled again, the contents of B2 were moved into B3, and then B1 moved into B2. This sequential process of moving material from bin to bin accomplished the necessary mixing and aeration to refresh the composting process. When all bins were full, B6 was supposed to contain mature compost to be marketed to landscape contractors, garden clubs and homeowners. The design composting period was 90 to 180 days total.
It was clear from the outset that the blend of manure and wood shavings is a nearly ideal material for composting. Temperatures at the center of the piles in B1 and B2 remained between 150 to 160 degrees F for a week or more. Within 6 weeks of starting the composting project, however, it became clear that B3, B4 and B5 would need supplemental moisture. From that point on, water was sprayed from a trailer-mounted water tank into the bin as the compost was turned and moved between bins.
Compost temperatures were measured daily in all six of the bins. After each bin was turned, the contents were shaped with a flat top to provide a convenient means of measuring temperatures at comparable locations within each bin. With the exception of B1, temperature measurements were taken at five locations across the top of each bin: one in the center and one at each of the four corners, approximately 18 to 24 inches from each wall. Temperatures in the raw material in B1 were measured only at the highest point in the bin.
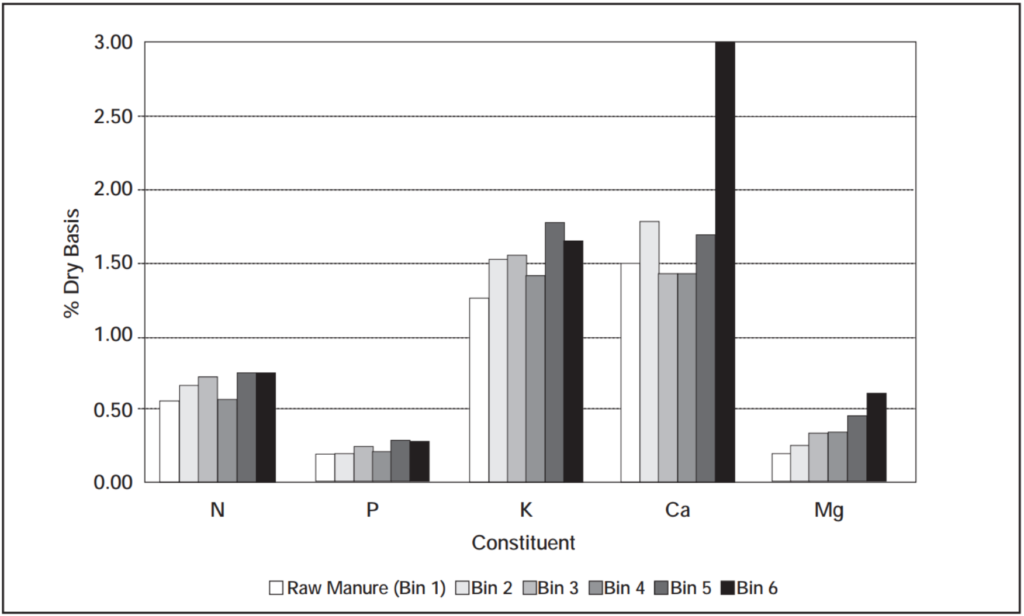
Macronutrient content in compost derived from horse manure and wood shavings.
The temperatures followed a fairly predictable pattern, rising after the bins were turned and moistened, then declining slowly. Actual temperatures at the center of each bin never exceeded 165 degrees F. The temperatures were easily sufficient to eliminate most pathogens and weed seeds. At each two-week interval when the bins were turned, grab samples of the compost from the center of each bin were collected for maturity testing (using the Solvita test kit) and routine laboratory analysis. Selected samples also were sent to a laboratory for determination of C:N ratio and nutient content.
Results showed slight increases in nutrient content over time. This phenomenon, although not obvious for many nutrients, reflects the reduction in total dry matter that occurs as carbon is driven off in the form of carbon dioxide. Because carbon is being driven off at a faster rate than the other nutrients, the amount of those nutrients as a proportion of total dry matter increases.
The N-P-K analysis (Fig. 1) of the finished compost averaged about 0.74 percent elemental nitrogen, 0.26 percent elemental phosphorus and 1.65 percent elemental potassium. The compost from this demonstration was roughly equivalent to a commercial fertilizer having an analysis of 0.75- 0.6-2.0. The finished compost (assuming a moisture content of approximately 25 percent when fully cured) provided approximately 11 pounds of nitrogen, 9 pounds of phosphorus (P205) and 30 pounds of potassium (K20) per ton of compost.
The results of the maturity tests suggested a consistent and complete process of maturation through the composting system. These data confirmed that the composting process was working as designed. In fact, demand for the product was so great and the system worked so well that finished compost was delivered not only from B6, but also from B5. Compost from both bins scored 7 or better on the Solvita test.
Additional information
Beck, M. The Secret Life of Compost: A How-to and Why Guide to Composting—Lawn, Garden, Feedlot or Farm. Acres USA, 1997.
Epstein, E. The Science of Composting. Technomic Publishing Co., Inc.1997.
Sweeten, J. M. “Composting Manure and Sludge.” L-2289, Texas Agricultural Extension Service.
TXDOT. “Furnishing and Placing Compost.” Special Specification Item 1009, Texas Department of Transportation.
Acknowledgements
Thanks to Gregg Veneklasen, D.V.M., for making the facilities at Timber Creek Veterinary Hospital in Randall County, Texas, available for this project.
The following individuals assisted with compost management, data collection and data analysis: Kevin Heflin, TAEX-Amarillo; Megan Campbell Williams, TAES-Amarilllo; and Bob Burkham, TAEX-Canyon. Thanks also are due to Dr. John M. Sweeten and Dr. Bob Robinson for providing resources for this demonstration through the Tierra Blanca Creek project.
Thanks to the reviewers for their many helpful comments and suggestions.
This demonstration and implementation project was funded in part by a Section 319 water quality grant from the United States Environmental Protection Agency and the Texas State Soil and Water Conservation Board.
Original article by Brent W. Auvermann, Lanny A. McDonald, Robert Devin and John M. Sweeten
